Did you know it’s possible to build a 100% native app with October CMS?
We are not talking about a Javascript SPA wrapped with PhoneGap and bundled into the app stores. We are referring to truly native applications, available in the iOS and Google Play stores, like this app we built for Falcon Green Recruitment.
You don’t even have to learn native development languages and do everything with PHP, CSS and JavaScript. Just build a mobile website using your regular tools and workflow, then have it compiled into a native codebase.
But how?
Contents
- How is it possible?
- Part 1 - Build Mobile Website
- Part 2 - Build Native App
- Part 3 - Distribute
- Conclusion
- Bonus Material
Build A Native App With October CMS Explained
All of this is possible because of two key pieces of technology:
1) GoNative.io
A ground breaking new service called GoNative.io, which allows you to enter your website URL and have that compiled into an app in less than five minutes. Feed it your website address and you will receive an email with a link to the source code for the iOS and Android apps. This can then can be uploaded to the app stores.
For a full explanation of how the service works, check our GoNative.io Review.
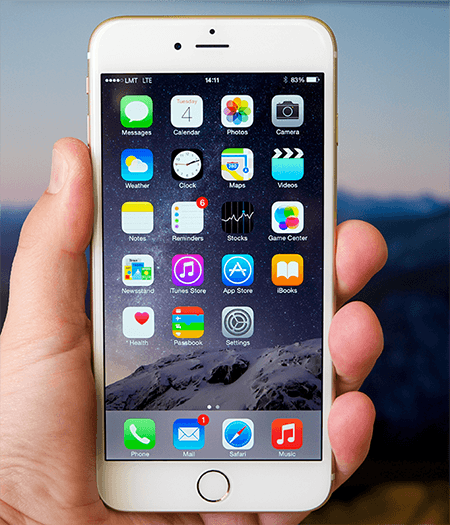
Download our portfolio app and see for yourself just how native it feels. Compare to any application crafted from the ground up by a native developer and you will struggle to find any noticeable differences.
2) October CMS Ajax Framework
October’s built in AJAX framework feature allows you to fetch data from the backend without needing a full page reload. It is a nice wrapper around the jQuery AJAX function and provide a clean way to make calls to your backend controllers from the front end.
You could compare it to the notable Javascript SPA libraries like React and Angular as it enables you to build rich client-side applications that are interactive and dynamic but the difference is that it's baked into the CMS core.
Any users on a mobile connection will thank you as the app won’t consume their data with unnecessary reloads to change one piece of information. From a developers perspective, it’s a dream to interact with the backend quickly without having to build API’s and handle authentication between it and the app.
Specifically, we used it on the registration form of our client's app when a user enters an email address. An AJAX request is fired off to the backend to check if the email already exists without having to submit the form. This simplifies the registration process and gets users into the app quickly.
If you compare October vs Wordpress or any other platform, you won't find any offering a feature like this that is built into the core.
Although GoNative.io will take care of 80% of the work, there are things needed on your side to make it look and feel like an app instead of a website. October makes this very simple, so let’s get started.
If you already have an October CMS powered website or any front end URL for that matter, you can skip ahead to Part 2.
For even more valuable tutorials, get the full eBook with Bonus material October CMS - Up and Running.
Part 1 - Build Mobile Website
Prerequisites
As usual, you need to Install October CMS Locally and then deploy to production. We have a very informative October CMS ebook that explains the best way to do this if you are a newbie.
It’s worth noting that we didn’t have to take any special actions during the setup just because we built an app and the regular website configuration worked for us.
1.1 - Start thinking mobile
This is a crucial phase and the reason we’ve listed it first. The toughest challenge you’ll face in creating a native app will not be a technical one. The biggest obstacle to overcome will be migrating your thought process from website development tailored for large screens to building native applications aimed at small devices.
Before you write a line of code, change your browser window from full size to a mobile device using the Toggle Device option with right click > Inspect.
Click the Toggle Device toolbar button and choose iPhone 6 in the device dropdown.
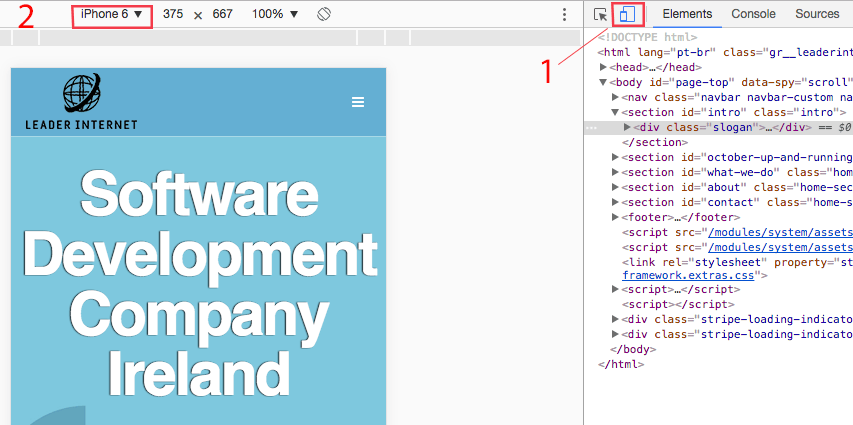
This forces you into mobile mode and gets your brain accustomed to the reduced real estate and scaled down nature of everything.
From the start, you should realise that traditional desktop features like popups, chat widgets, large images, charts and videos look poor on mobile. Hover states don’t even exist and the URL bar is removed. SEO is no longer a concern as the app will not be indexed by Google.
In place of these, we have gestures and interactions, App Store optimisation and native hardware back buttons. Users could be on data limited 3G connections so you have to serve them small images and dedicate time to PageSpeed.
The aim is to build a mobile website that is consumed by GoNative.io. It will use server side rendering to pipe the entire HTML response and data through with each request instead of expecting the device to build the view on the client side with Javascript. The users will only access the app by tapping the launch icon on their phone screen. You can get to it by entering the address in a browser and this is how you will preview the code during development. However, it’s not how people are going to find the app and you should block Google from crawling the URL with the robots.txt file.
With your mindset now shifted from website development over to building native apps, let's get into it.
1.2 - Choose a theme
Choosing a theme for your app is important because some are tailored for mobile, while others are purely for desktop resolutions.
You want a mobile first theme. Focus on what it looks like on the various phone and tablet sizes and forget about desktop.
Search for one that has a good mobile navigation consisting of a hamburger in the top right and a nice animation for opening and closing the menu. Interact with the nav a few times, scroll up and down, change pages and reload to get a full picture of how this theme will behave on a mobile device.
We are freaks for design and expect everything to be pixel perfect. Therefore built ours from the ground up as we had specific requirements for our nav and couldn’t find a theme that wouldn’t require significant editing.
However, there is no reason that you shouldn’t be able to choose one of the existing themes from the October directory. Once you have one, follow the regular theme installation process.
Leader Tip: Download the Bonus Material at the end of this article to see which theme we recommend.
The development can now begin.
1.3 - Build the mobile website
Using your regular development tools, processes and workflows, construct a mobile first website with October CMS. The only requirement is that it should look great on phones and has mobile specific navigation. After that its up to you what your app should be. Whether it offers a game, news, chat or an analytics hub is up to you. If it can be done on the web then it can be compiled into an app. Our client wanted everything behind a wall so the login screen is presented upon launch. The specific functionality of the app is your decision we won’t advise on what it should be.
When a user launches the app, GoNative will make a request to the URL you specify and load the response into a web view. For development purposes, you can do the same and preview the app by hitting the URL in your browser. Although we are building a native app with October CMS, remember that this is a just a mobile site loaded inside a native container.
PHP, CSS, HTML and Javascript provide more than enough power to build everything you need. If you want to get really fancy, there are Javascript libraries that act as a Native bridge between your web application and the native device hardware. GoNative also offers their own implementation of a JS Bridge and we used to trigger the native sharing dialog.
However you should be good with what you already know but if you need to provide a more app like experience, HTML5 has some nice API’s for hooking into native device features such as launching the camera.
The key point to remember is to always develop with chrome dev tools and iPhone in the device options.
1.4 - Plugins
This is no different any other October CMS Project so you can use all of the plugins in the marketplace. Choose whatever extensions you need to add more functionality to your app. It doesn’t matter if they are front end specific, back end only or applicable to both. This is just a mobile site served inside an app so you have total freedom to add whatever you want.
You should now have the functionality and view of the app constructed, allowing you to the implement tracking.
1.5 - Analytics
We are building a native app with October CMS but at it’s core, this is mobile website loaded inside a native container. Navigating around the app will issue HTTP requests for the various URLs of your mobile site so you can use Google Analytics to measure the web traffic and user behaviour.
Set up a Google Analytics property as you would for a regular website and drop the javascript tracking snippet into the layout file of your theme. Hit the site URL in your browser and check the Google Analytics realtime data. If the hit is logged then the Analytics integration is complete.
At this point, you should have the UI constructed and can move on to create a native app powered by October CMS.
Part 2 - Build Native App
If you followed part 1 to construct an October CMS site or already had one and skipped ahead, you are now ready to Build A Native App with October CMS
2.1 - Submit to GoNative.io
As you have a site that is mobile first and published to a production URL, it’s time to build version one of the app.
STEP 1 - Go to GoNative.io, enter the URL of your mobile site and click build.
STEP 2 - Wait for the code to arrive.
That’s all there is to get the first draft of your application delivered to your inbox. We did say it was an easy to use service. When the email arrives, download the iOS and Android source codes into two repositories on your machine. If you’re not going to keep them in Version Control, two separate folders will be fine.
2.2 - Install on devices
The local codebases can now be installed directly onto your device using a laptop and USB cable. This is strictly for testing purposes so you can preview and perfect the UI before app store submission.
Android
The process for Android is a lot easier and faster than Apple, which is perfect if you just want to see your app on a phone quickly.
- Log in to your email on the Android device
- Download the .apk file
- You should receive a prompt to install it
- Accept all of the popups about installing applications from the internet
- The native app will be added to your phone
- Tap the icon to launch it!
iOS
Installing on Apple devices is not as straightforward as the Android approach and takes some time. Be prepared to set aside a few days for this as it’s gnarly. There are so many steps that we can’t explain them all in detail but have summarised and pointed to the official docs and guides where possible.
Prerequisites
A Mac - If you don’t have one you can’t install onto an iPhone/iPad
An Apple developer account - These take a few weeks to acquire and cost about $100.
Bundle ID - the unique identifier for your app in the Apple ecosystem. It’s created by you and is basically your website URL in reverse order. If your app is called example.com then the Bundle ID will be com.example.app
Signing Certificates - These are used to digitally sign an app during the build process. This allows Apple to be certain the code comes from a credible source known to them and hasn’t been tampered with. Learn more at Maintaining Your Signing Identities and Certificates. Create a development one to start
Provisioning Profile - indicates the devices for which an application is correctly signed and can be installed on. Tied to a certificate. Use development for now
Xcode - Apple’s tool for building apps. The download can take hours so be prepared
- Register your phone as a test device. Enter the serial number in Apple Developer Portal under devices > all
Items 2-5 can be very confusing for experienced developers, let alone newbies. It is hard to understand why they have made it so difficult. Just remember that they are created on the Apple developer portal. If you are confused, there is decent answer on Quora, that summarises all of this.
Thankfully it’s a lot simpler and faster from here.
Download the appConfig.json file from the email sent by GoNative and copy it into your local project folder. This is a requirement for the iOS app. Then download the iOS source code from the GoNative manage page and copy it into the same folder.
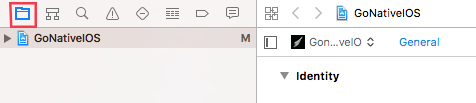
Browse to the local version of the code and right click GoNativeIOS.xcodeproj > Open with > Xcode
Click on GoNativeiOS in the explorer and the General Tab:
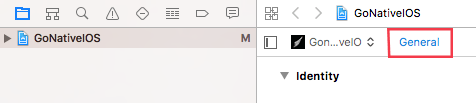
If you can’t see general, click on the first folder icon click and GoNativeIos under the first folder in the tree:
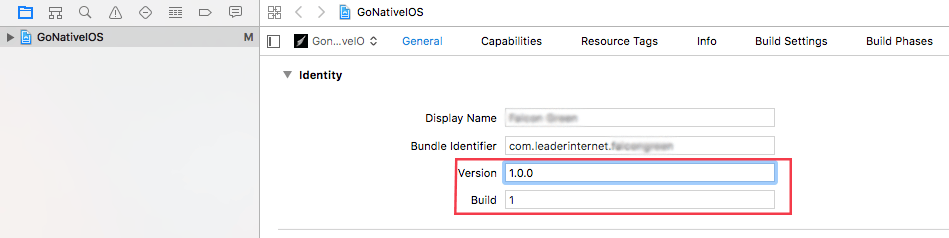
In the General tab, under Identity set the Version to 1.0.0 and Build to 1. The Display Name and Bundle ID are pre-filled from GoNative:
Under signing, check Automatically Manage Signing:
Select your profile from the dropdown underneath. This is the Provisioning Profile created earlier. If it’s not displayed, go to the Xcode preferences, remove it then add it again.
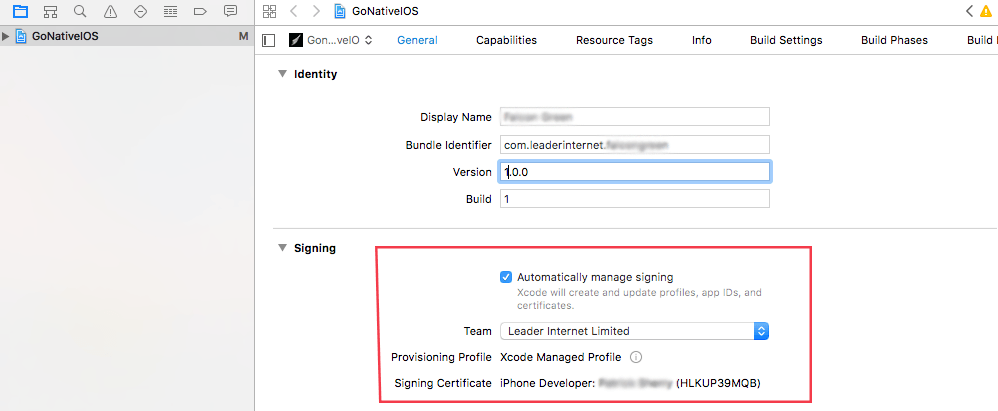
Under Deployment Info choose the version of iOS you have on your phone and Universal:

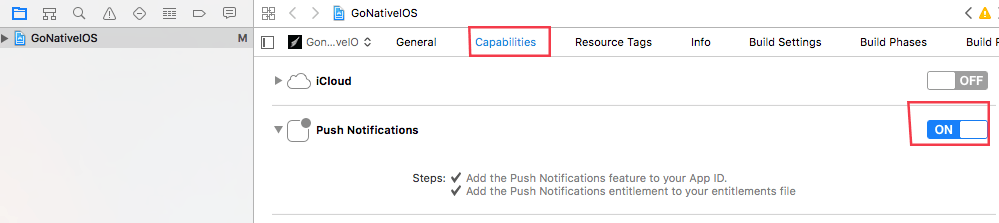
Go to the Capabilities tab and make sure push notifications are turned on:
Connect your device
Select it as the build target using the device selector dropdown and then Play:
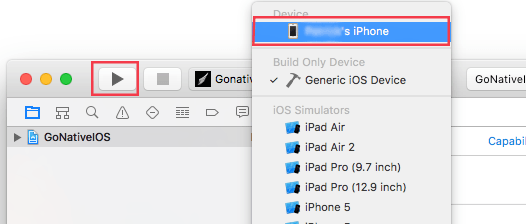
The app will now be installed on your phone.
You are probably feeling quite happy as you now have your own native app built with October CMS and installed onto your phone. You’ll have noticed that it uses default icons and styles. Those can be customised to suit your branding.
2.3 - Push notifications
An integral part of a native application is the ability to send global or personalised push notifications to users that have the app installed. This is a primary motivation for product owners to build an app but was previously a laborious task for developers to setup, build and test.
To make things incredibly simple, GoNative.io have integrated with the OneSignal API to enable push notifications by adding your OneSignal ID to the build settings.
Go to OneSignal.com and sign up for an account. Create an app in their admin panel and grab the app id. The GoNative.io docs explain this in more detail.
Copy the ID to your clipboard for use in the next step.
2.4 - Customise The Build
GoNative.io will build the app with default settings at first so they can deliver a codebase quickly. The Manage Configuration link in the email will take you to the build settings page where you can make some customizations to align with the styles and functionality of your app.
There are a lot of options for you to play with and the official documentation explains each of them. We’ll just deal with the things that we changed:
- General Styling > Set the launch icons
- Navigation > configure refresh and back functionality
- Navigation > iOS refresh button - OFF
- Navigation > iOS contextual back button - ON
- Push Notifications > Turn them on and paste in the One Signal ID you stored earlier.
- Click Save
A new build will be emailed to you.
This can be installed over the top the earlier version. Expect to make lots of changes and tweaks to the GoNative configuration as you move through the phases of building your app. When you make an edit and request a new build, it only takes five minutes to arrive and there are no limits to the number of builds you can make.
2.5 - Test Test Test
Once you have a build installed on a few devices, you will need to test it thoroughly. It’s difficult to write automated Unit Tests so you should build a test suite of the critical functionality in your app and go through it manually. Registration, login/logout, creating articles and sending push notifications are the most important features of our application and the areas that we test inside out.
Don’t be surprised if a feature works on Android but doesn’t work on iOS and vice versa. This can happen with the simplest of functionality as they are entirely different operating systems.
When you make updates, go through the test suite again to make sure bugs haven’t reoccurred. This may seem time-consuming but it’s worth the investment if it catches breaking changes in your code.
If you are confident that you have caught all the bugs you can move towards the distribution phase.
Part 3 - Distribute
With the initial development completed, the last block of work will get it live in the app stores.
3.1 - Soft Launch
It is a good idea to get other people to look at your app as they will interact with it in different ways and possibly find issues or less than optimal features for you to review. There are nice processes to assist with the distribution and feedback loop, so you are not sending emails around with attachments.
iOS
iTunes Connect is the environment to publish and manage iOS apps. Apps are created here along with the app store listing page and meta data. You upload a build to an app listing directly from Xcode and then publish.
Before you can upload your code you need the listing page so add one in iTunes Connect. Fill out the meta data and basic app information.
Uploading the build
When you have a build that you want to distribute, go back to Xcode and select Generic iOS device in the device selector.

Go to Product > Archive.
When that completes you will see a page with your build listed. The codebase needs to be validated before it can be uploaded so click the Validate button:
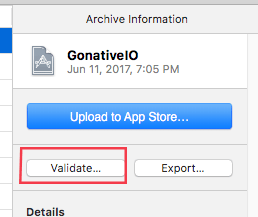
After a successful validation, click Upload to App Store. This will take about 10 minutes and consume a lot of computing power so don’t be surprised if you can hear your hard drive spinning.
When it completes, go over to iTunes connect and you will see the upload under the Activity tab with a processing flag. When the processing is complete you’ll receive an email notification.
It can now be dispatched to testers.
TestFlight
Apple provides a very useful tool for distributing beta versions of the app called TestFlight. It allows an approved list of 100 testers to install the app and experiment. As you’ve already gone through the heartache of developer accounts and provisioning profiles, TestFlight is quite easy to configure.
All you have to do is specify the email addresses and upload a build. Mark this for testing and Apple will perform a quick review. They will then send emails to everyone on your tester list with instructions on how to install. It allows you to attach notes with each build in case your app is still in development or has known bugs.
Users can provide feedback using the inbuilt TestFlight reporting service. In reality, there won’t be too many evaluations coming in but if you had an enterprise level app, this feature offers a systematic way to manage the incoming feedback.
A TestFlight build is valid for 90 days and they expire on their own. You can upload new builds for testing at any time and push these out to everyone or a subset of testers. It’s best not to spam your audience with builds so reserve TestFlight for pre-launch phase when you’ve already worked out most of the bugs.
The TestFlight tab is available inside iTunes Connect. It is intuitive and easy to understand but if you want to read more, the official docs explain everything you need.
Android
We performed extensive iOS testing as most of our audience are iPhone users. Therefore we just tested our Android build on the few devices that we own without distributing it to the masses. The feedback loop is much quicker when we can just build and push without having to go through any platforms.
The Google Play Developer console has options for Alpha and Beta testing if you want to distribute it to a batch of Android Testers.
With your app tested internally and verified by an external audience, you can submit it to the app stores.
Leader Tip: If you don't have an external audience, consider using a third party tester from PeoplePerHour or Fiverr to QA you app from the outside. Another pair of eyes will find bugs you didn't know about and provides a level of quality that you would otherwise lack.
3.2 - iOS App Store submission
The difficult part is out of the way and the rest can be completed quickly.
In iTunes Connect, click App Store on the very left of the nav and + version to create a new build
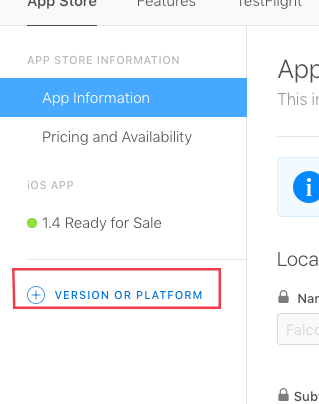
Give it a version number like 1.0.0, fill out the required information and add screenshots. Press the + icon beside build and select the version from TestFlight that you want to release then save and submit for review.
The app will now go into Apple’s review backlog. It can take anywhere from 24 hours to a week for them to get to it, especially as this is your first submission. Most people fail their first review as Apple’s guidelines are very strict. However, they will give feedback for you to implement and re-submit.
Apart from that, all you can do it wait.
When you finally have an approved build you can set the app live.
3.3 - Google Play Submission
Dealing with Google Play is a lot easier, faster and quicker than the Apple equivalent as it is open source software.
Create a google developer account and then an application.
Set up an app listing page similar to iOS under the Store Presence tab. You can use the same information and screenshots from the iOS listing.
- Upload the build
- Go to Release Management > App Releases > Manage Production > Create Release
- Upload the .apk
- Fill out the meta data, information about what has been added and Save
- Click Submit
Google’s review process doesn’t require any manual review so you will receive a notification in around 15 minutes with the status.
Your app will then be live on Google Play.
3.4 - Post Launch
Congratulations. Your app is now live in the Apple and Google Play stores. Consider the amount of time it took compared to how long it would have taken you to learn native development or the cost of hiring a native app developer.
Make sure to spread the news with your email list, social media profiles and word of mouth.
Google analytics will help you inspect the behaviour of users inside your app and the actions they take. An added bonus is that you also have the benefit of native app analytics which is available in the Apple and Google Developer Portals. They will give you install data that Google Analytics cannot provide so you have total insight into the performance of your app.
Marketing companies that continuously monitor the app stores for new submissions will contact you offering their services. There’s no need to dive in here and they can be ignored as their results are often questionable.
Conclusion
GoNative.io provides endless opportunities for Web Developers to move into the native realm but there will be bumps along the way. You already had the skills to build a Native app with October CMS but now possess the tools and a guide to help you through the process.
If you want to create a native app without knowing native code, use this guide as your base.
Let us know what you think in the comments below and post your app if you used this guide to build it.
Bonus Content
Enter your email to download our list of tips for Building a Native App with October CMS, including the theme we recommend for ultimate flexibility.
It also includes a list of services you can use add native functionality to your app.
Goran 06.12.2017
I didn't realise October's AJAX framework could come in useful in Native Apps. Very Interesting
Tmax7 08.06.2017
Cool. The section on Xcode is very helpful and the bonus material has more good advice.