For even more valuable tutorials, get the full eBook with Bonus material October CMS - Up and Running.
At this point you have the default October CMS site live and a local version running on your machine. However, the standard theme is very bland and lacking in rich functionality.
In this article you will learn how to apply a trendy theme, install a plugin and finally customise October CMS the site to suit your exact needs.
Contents
- October Projects
- Create Your Project
- Bind Project ID to Your Installation
- Apply New Theme
- Install Blog Plugin
- Customise Plugin
- Conclusion
- Next Up
October Projects
October has a nice feature called Projects which allows you to group plugins and themes under a Project ID. A single site will have a Project ID and this will be shared by the local, staging and production versions of it.
What this means in practice is that you can add a plugin or theme to your project once and it will be auto installed on all environments where your project is running so you don’t have to upload files to multiple locations.
Create Your Project
- Login into the OctoberCMS official site and go to Account > Projects > Create Project.
- Give it a name, short description and long description.
- Click Create Project .
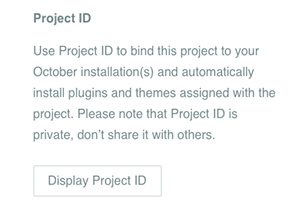
- Once created click into the project and locate Project ID on the right side.
- Click Display Project ID and copy it to the clipboard
Bind Project ID to Your Installation
- Log in to your local installation and go to Settings > Updates & Plugins
- In the top left corner, click Attach Project and paste in the key you copied
The Project ID is now bound to this OctoberCMS site and every plugin or theme you install will be applied to all environments where your installatios with our own versionn is setup.
Apply New Theme
We can now see the Project Binding in action when picking a new theme.
- Go to https://octobercms.com/themes and choose one that you like.
- Click Add To Project
- Select your project from the list and click Add To The Selected Project.
If successful you will see a popup with ‘The product has been added to the selected project’
- Now log in to your local installation and go to Settings > Updates & Plugins
- Click Check For Updates.
- October will recognize that you applied a theme to this project and will show it in the updates modal:
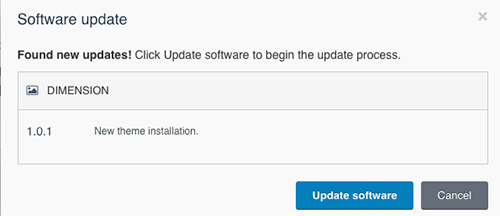
- Click Update Software
- While still in the Settings window, in the Left Nav select > Front End Theme
- Locate your theme and click Activate
- Refresh the front end and your theme will be active
Install Blog Plugin
We have a snappy new theme so it’s time to add some plugins to give additional functionality. One of the most popular is RainLab’s Blog Plugin.
- Go to https://octobercms.com/plugin/rainlab-blog and add it to your project.
- Back in the Updates & Plugins tabs under Settings, check for updates and Update.
You will now have the Blog tab in the backend top navigation so click on it and create a blog post.
Customise Plugin
The Rainlab Blog plugin is a truly wonderful piece of software. It gives so much functionality off the shelf, which you don’t have to build and it’s completely free.
However, you may not be happy with the UI and need to change it slightly. To demonstrate How To Customise October CMS like this, we are going to add a ‘Read More’ link to each blog post item on the blog page.
One of the great things about October is that it was built with extensibility in mind so making edits is a simple task if you follow our guidelines. Basically we override the plugin components with our own versions allowing you to put together your own customised verion of October CMS. They start out as exact copies and then we can customize as necessary.
- Go to the blog page inside the CMS and click on the blog component.
- Change the alias from blogPosts to postsList, which will be the name of our bespoke component:
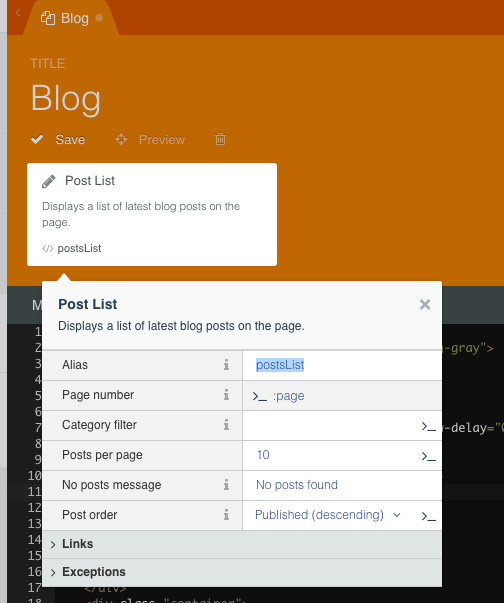
- Also change the snippet of code where the component is placed on the page from blogPosts to postsList
{% component 'postsList' %}With the code now looking for our custom component, we need to create it. The front end html for plugin components can be overridden in the themes/YOUR_THEME/partials directory.
- Create a postsList directory in here. Inside that create a default.htm file
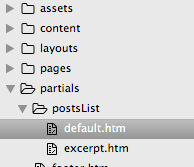
- Now copy the original code from plugins/rainlab/blog/components/posts/default.htm into your new file.
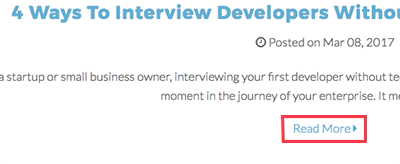
- On line 18 add:
<a href="{{ post.url }}">Read More <i class="fa fa-caret-right" aria-hidden=“true"></i></a>Save and reload the front end. You will now see the Read More link on every blog post.
There are no limits to the customizations you can make not only on the front end but also in back end code as well. Use this as a basis for making simple html edits and when you feel you have mastered it you can move on to more complex PHP changes.
How To Customise October CMS Conclusion
In this post you learned how to customise your OctoberCMS site and transform from the standard install to a beautiful, responsive and feature rich domain customized to your exact needs. It now has a greater chance of being successful than a default template with no additional functionality.
Next Up
Your site is live but what if updates are made on the production CMS? October generates PHP classes whenever a user creates or changes a page. If you push a commit it will overwrite them or cause merge conflicts on the server? Learn how to handle that scenario in our next post.
Adil 07.20.2017
Hi, How about extending the front end for the User->Profie. The solution provided here is absolutely fine but how about https://github.com/rainlab/userplus-plugin/issues/13